
This quick guide introduces techniques and strategies for instant granular restoration of just a few VMware ESXi VM files using the Bacula Enterprise Single-Item Restore plugin.
Installation
Packages for the VMware Single File Restore plugin are available for supported platforms, contact us to receive them.
The plugin must be installed on the same machine as your Storage Daemon server, and some disk space is required in order to Bacula mount the VM backed files during restore. Also, only disk-based backups are supported by instant recovery techniques (not magnetic tapes).
Also, in order to use the bweb GUI with the Single-Item plugin, it must be also installed on this same host but it is out of the scope of this guide.
It is advisable to use the customer exclusive Bacula Enterprise packages repositories for dependency install if still not configured (replace xxx for the Bacula Systems secret customer URL code):
yum install -y yum-plugin-priorities

# cat /etc/yum.repos.d/baculasystems.repo
[single_file_restore_vmware]
name = Red Hat Enterprise - RPMFORGE
baseurl = https://www.baculasystems.com/dl/<xxx>/rpms/single-item-restore/10.2.2/rhel7-64/enabled = 1
protect = 0
gpgcheck = 0

[dag]
name = Red Hat Enterprise - RPMFORGE
baseurl = https://www.baculasystems.com/dl/DAG/rhel7-64
enabled = 1
protect = 0
gpgcheck = 0
priority = 1

#Note: This last repository is required on RHEL7:

[Bacula-Enterprise-Edition-DAG-Guestfish]
name = Bacula Enterprise Edition - DAG for Guestfish
baseurl = https://www.baculasystems.com/dl/DAG/rhel7-64/guestfish/
enabled = 1
protect = 0
gpgcheck = 0
priority = 1
Still, for Redhat, it will be needed to install perl-JSON package from rpmforge and the libguestfs-winsupport package. On Redhat 7.x, it is necessary to install a custom version of the libguestfs package and the ntfs-3g package from the EPEL repository to support NTFS devices. To install the EPEL repository, please follow the official instructions on the EPEL website to install the “epel-release” package here: https://fedoraproject.org/wiki/EPEL. E.g.:
yum -y install https://dl.fedoraproject.org/pub/epel/epel-release-latest-7.noarch.rpm
yum -y install libguestfs ntfs-3g
Once the repositories are configured, it is possible to install the Single-Item plugin package with yum. The package manager will ensure that your Bacula Enterprise Edition version is compatible with the VMware Single File Restore plugin and will install dependencies:
yum install bacula-enterprise-single-item-restore perl-JSON
Alternatively, download the plugin package to and then install using the package manager like so:
rpm -ivh bacula-enterprise-single-item-restore*.rpm
Restart bacula-sd and bweb, if installed:
service bacula-sd restart
service bweb restart
Preparing the bacula Linux User
All Single-Item Plugin commands in this document use the “bacula” operating system account to run.
On Redhat, the Unix “bacula” account is locked by default. It means that it’s not possible by default to execute a command such as “su – bacula”.
To unlock the “bacula” account and use “su -” with a command such as:
root@storage# chsh -s /bin/bash bacula
root@storage# su - bacula
bacula@storage# whoami
bacula
In order to test or use Single-Item restore in the command line, it is possible to use the user bacula with:
root@storage# sudo -u bacula /opt/bacula/bin/bconsole
Samba SMB Shares
The Bacula Enterprise Edition VMware Single File Restore plugin can automatically set up Samba SMB shares from the console program or the BWeb Management Suite, so the end user can access mounted files directly.
To enable Samba SMB network shares, installing and configuring the “samba” package is mandatory. Run install-single-item-restore.sh script.
root@storage# /opt/bacula/scripts/install-single-item-restore.sh install
Do you want to initialise Samba smb.conf [yes/No]: yes
Choose a Workgroup [BACULA]:
root@storage# cat /etc/samba/smb.conf
[global]
workgroup = BACULA
include = /etc/samba/conf.d/all
At this point, it is possible to modify /etc/samba/smb.conf to add your own configuration directives.
VMware Backup Plugin
Bacula needs to mount the disk of the selected virtual machine on the system for granular restore. These steps are usually quite fast, but the time depends a lot on the configuration used. Indexes are created and kept during this phase to speed up any further restore requests. To create the index during the backup phase, the FileSet Vmware Backup Plugin option index can be used. E.g.:
Plugin = "vsphere: host=myhost index"
Configuration
On the Storage Daemon host server, the bconsole program should be configured properly to let the “bacula” user connect to the Director with /opt/bacula/etc/bconsole.conf. It should be already configured it is the same Director machine.
The Plugin package also contains a script to test the connection with the Director and to test if the system can mount the Bacula Virtual File System properly.
bacula@storage# /opt/bacula/scripts/install-single-item-restore.sh check
I: Try to restart the script with sudo...
I: Found catalog MyCatalog
I: bacula-fused started on /tmp/bee-bfuse.XXXXX
I: MyCatalog found
I: 10 Client(s) found
I: /tmp/bee-bfuse.XXXXX unmounted
I: bacula-fused (rw) started on /tmp/bee-bfuse.XXXXX
I: MyCatalog found
I: 10 Client(s) found
I: /tmp/bee-bfuse.XXXXX unmounted
OK: All tests are good.
The Bacula Virtual File System is not designed to be used by end users to browse or restore files directly. If you try to access and browse the mount point, you may not see any files or files may have strange permissions, ownerships and sizes and will inaccessible even to the root user.
Restore
Using bweb
The VMware Single File Restore option in BWeb Management Suite is a wizard that provides easy restoration of files from a VMware guest.
As shown in Figure 1, use the Restore > Single-Item Restore menu to start the process. Then, select the Client where the vSphere backup job was done.
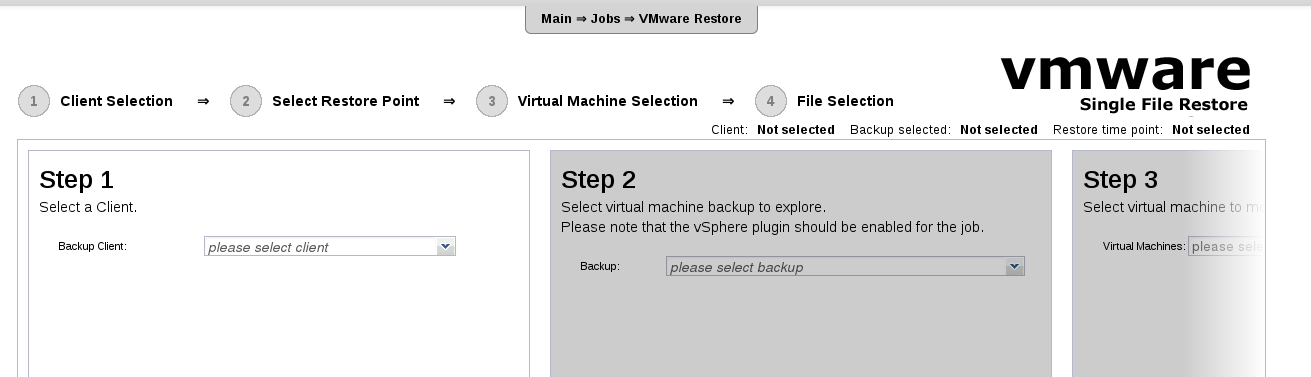
Figure 1. Vmware Single-Item Restore Screen
As exhibited in Figure 2, the administrator needs to select a VMware backup Job to restore.
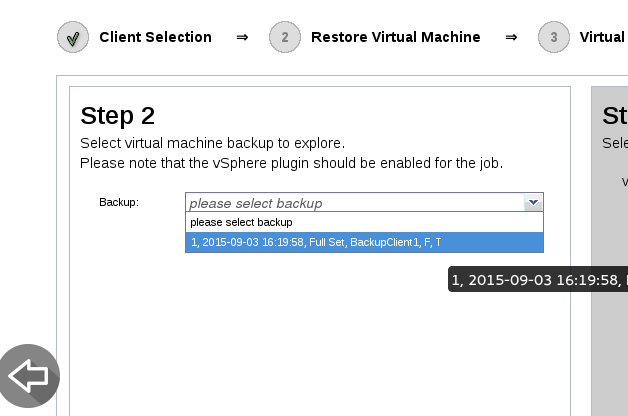
Figure 2. Backup Job Restore Selection
At this point, Bacula needs to build a virtual image of the selected virtual machine. The time depends a lot on the configuration used, and VMware Plugin indexes can be enabled to speed up this process, as stated before.
As displayed in Figure 3, the selected virtual machine files will be displayed in a file browser where it is possible to select files or directories to restore.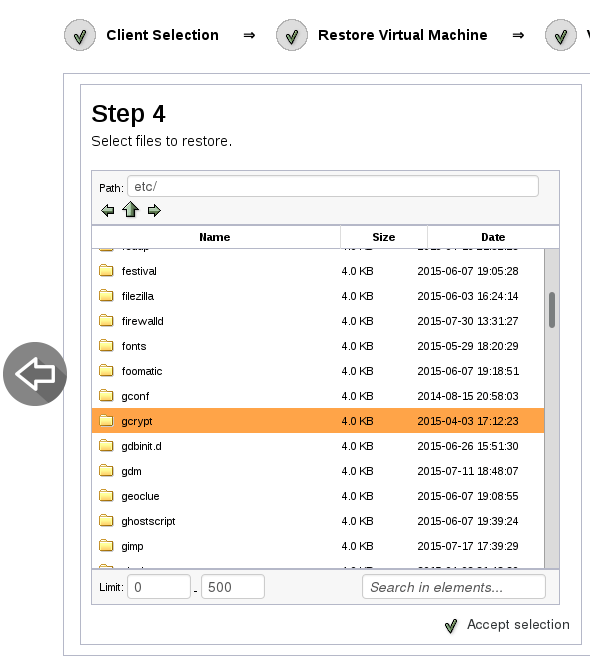
Figure 3. File Selection
The administrator can then choose to generate a ZIP or a TAR archive. The archive will be generated automatically and will be stored in /opt/bacula/working. A secure HTTP download link will be generated, and the administrator can provide this link to the end user.
If BWeb Management Suite is configured to use HTTP Authentication, it is necessary to configure lighttpd properly to allow “anonymous” users to download their files.
As viewed in Figure 4, for each selection, the administrator can choose how to retrieve the files directly, compressed as a tar file or a zip file.
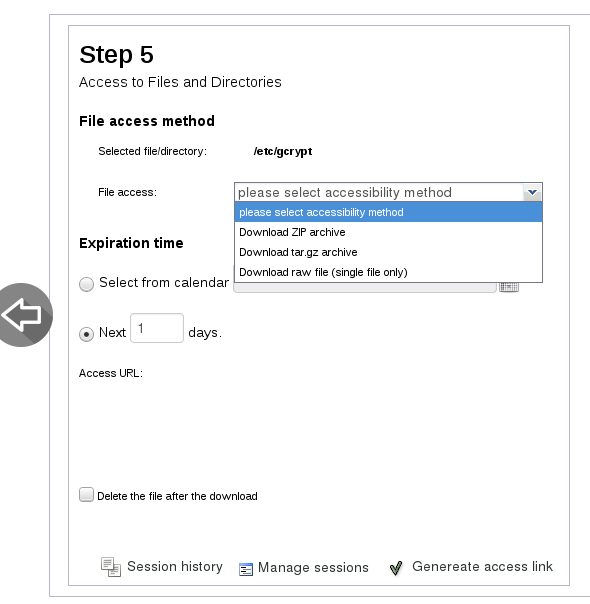
Figure 4. Restored Files Access
Once the restore has taken place it is important to terminate the restore session to release resources.
With Text Console Interface
The VMware Single File Restore plugin provides a simple console program that provides access to files inside VMs. E.g.:
bacula@storage# /opt/bacula/bin/mount-vmware
Automatically Selected Catalog: MyCatalog
Client list:
1: 127.0.0.1-fd
2: win2008-fd
3: rhel7-fd
Select a Client: 1
Selected Client: 127.0.0.1-fd
Job list:
1: NightlySave.2015-09-01_10.49.18_39
2: pluginTest.2015-09-01_10.40.20_04
3: pluginTest.2015-09-01_10.46.19_08
Select a Job: 2
Selected pluginTest.2015-09-01_10.40.20_04
Virtual Machine:
1: squeeze2 (5)
2: win2008 (6)
3: rhel7 (7)
Select a Virtual Machine: 1
Selected squeeze2 (5)
Actions list:
1: Mount guest filesystem locally
2: Export guest filesystem through SMB
3: Cleanup
Select a Actions: 1
Selected Mount guest filesystem locally
I: Files are available under /opt/bacula/working/vmware/5
I: Press enter to finish and cleanup the session
In this step, the virtual machine filesystem is mounted locally (in the example above, files are available under /opt/bacula/working/vmware/5. It is possible to browse directories and copy files (with cp, scp, ftp) as with a standard filesystem from another terminal session with the “root” and “bacula” operating system accounts. If you need to use another account to operate on files, use the “-o allow_other” option when starting the mount-vmware script.
bacula@storage# ls /opt/bacula/working/vmware/5
bin   dev  home        lib        media  opt   root   selinux  sys   usr   vmlinuz
boot  etc  initrd.img  lost+found mnt    proc  sbin   srv      tmp   var
To clean up the session, just press “Enter” in the terminal session where the mount-vmware script was started.
Starting with Bacula Enterprise version 8.4.8, it is possible to limit the mount-vmware program Job list with the following command line options:
- -s=<days> Limit the job list to the last days
- -l=<number> Limit the job list to the last number entries
- -f=<filter> Specify an advanced filter based on the Job name, the FileSet name or the JobId
Example:
# Limit the job output to the last 100 jobs
bacula@storage# /opt/bacula/bin/mount-vmware -l 100
# Limit the job output to the last 30 days
bacula@storage# /opt/bacula/bin/mount-vmware -s 30
# Limit the job output to jobs that start with ``MyVMware''
bacula@storage# /opt/bacula/bin/mount-vmware -f 'jobname=MyVMware*'
# BAD USAGE for the filter option, it will search for a job named ``MyVMware''
bacula@storage# /opt/bacula/bin/mount-vmware -f 'jobname=MyVMware'
# Limit the job output to jobs that start with ``MyVMware''
# and that use the FileSet Test1
bacula@storage# /opt/bacula/bin/mount-vmware -f 'jobname=MyVMware* fileset=Test1'
# Limit the job to the jobid XX
bacula@storage# /opt/bacula/bin/mount-vmware -f jobid=XX
On some cases, the device detection doesn’t work properly. It is possible to use the -m option to mount recognized disks in a simple way. The option is automatically set when only one disk is selected during the restore.
bacula@storage# /opt/bacula/bin/mount-vmware -m
Support
The install-single-item-restore.sh script can collect logs and traces automatically when a mount-vmware session is running.
root@storage# /opt/bacula/scripts/install-single-item-restore.sh support
Reference
VMware Single File Restore Bacula Enterprise Edition – http://baculasystems.com
Disponível em:  Português (Portuguese (Brazil))
 English
 Español (Spanish)